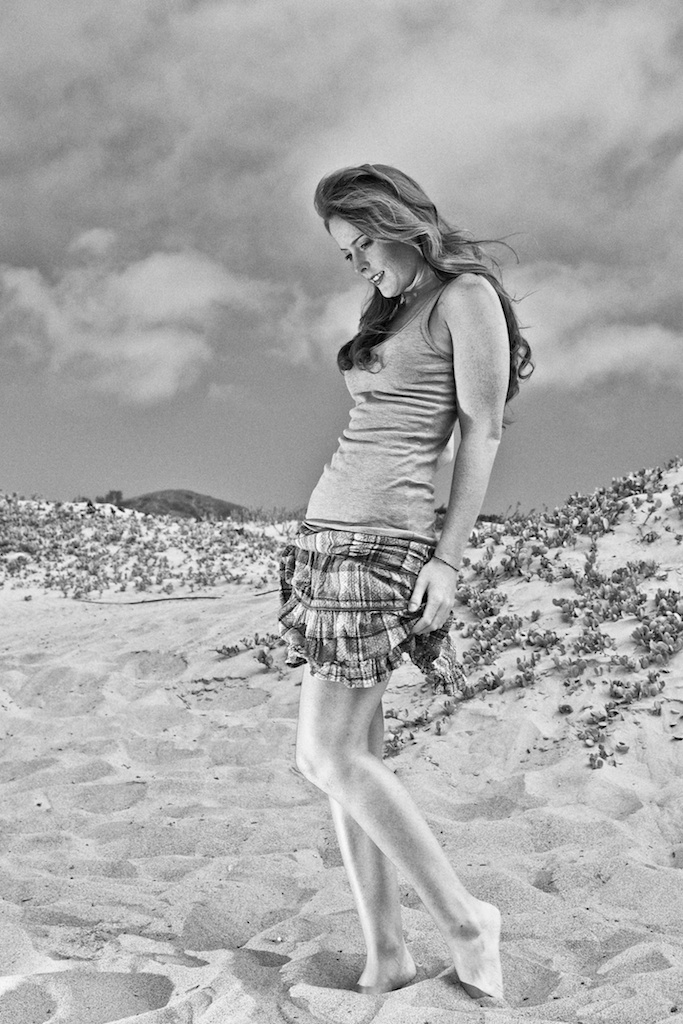
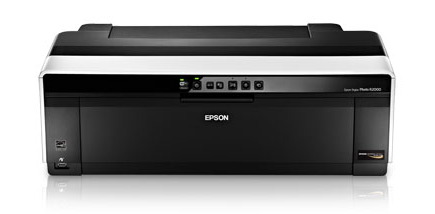
Recently in Photography

  Page 257 of 383 in Photography  

Even though the Olympus PEN E-PL2has a pop-up flash, you're not stuck with it solely for advanced lighting techniques. You can slide an external flash in the hot shoe, or better yet, let the E-PL2 control RC-capable Olympus strobes that aren't even mounted on the camera. Yes, off-camera flash is possible with the E-PL2.

E-PL2 Flash Menu Off-camera flash controls via the menu system on the Olympus E-PL2.

I've been testing this functionality with the FL-50R full size flashand the FL-36R compact flashwith the E-PL2 and the XZ-1. The FL-36R is lighter, only uses 2 AA batteries, and sits on the smaller cameras better than the heavier FL-50R that uses 4 AA batteries. I've already done single flash portraits with the FL-36R, so I wanted to try a 2-flash set-up. I decided to tackle a most difficult subject: artwork behind glass. Talk about unforgiving flash work.

Off-Camera Flash Set Up A framed Alfred Eisenstaedt poster behind glass ready to be photographed with two flashes off camera.

I put the flashes in "RC mode" and positioned them equal distance and at similar angles from the framed print, then put the camera on the tripod. I enabled RC flash mode on the E-PL2 so the camera could communicate with both units. Since the FL-50R is more powerful than the FL-36R, I decided to go with manual exposure for the flashes, setting the FL-50R at 1/128 (Group B) and the FL-36R at 1/50 (Group A). This gave me relatively even flash output from both sides.

But to make this all work, I had to enable the pop-up flash on the E-PL2. This was really the only fly in the ointment. Even thought the pop-up unit isn't part of the exposure, the flash does have to fire to trigger the two external units. This caused a reflection in the glass. And there was no way to turn off the pop-up and still trigger the external strobes. When your subject isn't close to the camera, or reflective, this shouldn't be a problem. But it presented a challenge for me with this assignment.

I decided to hold my hand in front of the pop-up so it would not shine directly in to the glass, but could still trigger the external units. This worked relatively well. You can examine the image below. It isn't perfect, but it's not a bad photo of glass-covered art work.

Glass Covered Artwork Shot with Two Off-Camera Flashes Not a perfect reproduction, but much better than I could have done with just a single on-camera flash.

The Bottom Line

Even though it isn't as powerful, I like the Olympus FL-36R flash($219) as both a shoe mount and an off-camera flash for the Olympus E-PL2 and XZ-1. If you want to set up more sophisticated lighting schemes, you can add a second FL-36R or even the more powerful FL-50R and control both units from the camera. The only real downside is that the built-in flash does have to fire to trigger the off-camera units. So, there will be situations when you have to diffuse that light so it doesn't influence the main subject.

More Off Camera Flash Tutorials

If you want to learn more about getting pro results from a single flash, be sure to check out my Off Camera Flash title on Lynda.com. I show you all sorts of helpful lighting techniques that are especially good for portraits.

Off Camera Flash - Basic Techniques for Pro Results

Light Modifiers for Off Camera Flash

Off Camera Flash - The Single Light Portrait

"More Off Camera Flash" - Digital Photography Podcast 233

twitter.jpg Follow me on Twitter


Samsung NX 100

In my Macworld review of the Samsung NX 100 ILC camera, I say that it's an innovative camera, but not always a practical one. Its large APS-C sensor in a relatively compact body is alluring. But lack of lens options and no pop-up flash put it behind the competition from Sony, Olympus, and Panasonic.

So here are my Pros and Cons for the NX100:

Pros

  • iFunction Ring handy for quick settings
  • "Smart" exposure mode is fun and relatively useful
  • Great image quality from ISO 100-400; good quality up to1600
  • Large APS-C sensor in a slim camera body
  • Clear menu system that's generally easy to navigate
  • Competitive pricing for a CILC

Cons

  • No pop-up flash
  • Slippery grip
  • Noisy lens focusing
  • Lacks built-in IS with kit lens
  • Effective 30mm-75mm zoom range of kit lens not wide enough
  • Lacks dedicated video recording button

The bottom line is, I don't recommend the Samsung NX 100, considering that I like the micro four/thirds options from Olympus and Panasonic better, not to mention the pretty nice Sony NEX series.


twitter.jpg Follow me on Twitter


Black & White photography is beautiful, artistic, and easier than ever to create dynamic images. In this week's podcast, I first talk about Silver Efex Pro 2 for converting color photos, I then get into a a couple techniques that you can do without any additional software. Either way, it's a great way to spice up your photography.

Marin Headlands

You might also want to read my Silver Efex Pro 2 review where I describe the simple workflow I use with that application.

I've also published a gallery of B&W images for your reviewing pleasure.

Listen to the Podcast

You can also download the podcast here (31 minutes). Or better yet, subscribe to the podcast in iTunes. You can support this podcast by purchasing the TDS iPhone App for only $2.99 from the Apple App Store.

Monthly Photo Assignment

Broken is the April 2011 Photo Assignment. You can read more about how to submit on our Member Participation page. Deadline for entry is April 30, 2011.

TDS Fall 2011 Photography Workshop

We're making plans now for the Fall 2011 TDS Photography Workshop. If you want your name on the reserve list, just drop me a line.

More Ways to Participate

Want to share photos and talk with other members in our virtual camera club? Check out our Flickr Public Group. It's a blast!

Podcast Sponsors

Red River Paper -- Try the $7.99 Sample Kit.

Make Your Photos Sizzle with Color! -- SizzlPix is like High Definition TV for your photography.

Need a New Photo Bag? Check out the Lowepro Specialty Store on The Digital Story and use discount code LP20 to saven 20% at check out.


Technorati Tags:
, , , , ,


Pat with GoPro HD Hero

If you want to show people what you've experienced on a bike, surfboard, skis, or just rambling down a hiking trail, then you should check out the GoPro HD HERO Camera($299) that provides an amazing POV experience for your audience.

Operation couldn't be simpler. Just mount the camera on your helmet or anywhere else that seems appropriate, choose the resolution and frame rate you want (it records up to full HD at 30 fps with audio), start the camera, and begin your adventure. The HD Hero records to a standard SD card in H.264 format that can be played on a Mac or Windows computer.

I had no problem dumping the video files into iMovie and producing this YouTube presentation of a ride that Pat and I took together (that's Pat above modeling the HD Hero so you can see what it looks like in its protective housing).

I was very impressed with the footage that we captured with this little device. Some of its feature highlights include:

  • Professional-grade full HD video up to 1080p
  • 60 frames per second option in 720p and WVGA resolutions provides slow motion playback
  • Videos can be easily edited with iMovie or Windows Movie Maker
  • Industry's widest angle (170ยบ) and sharpest lens captures more of the scene
  • Includes easy to apply mounts for attaching camera to virtually all helmets

With the weather finally warming up here in Northern California, who knows what escapades we'll be able to record this Spring.


twitter.jpg Follow me on Twitter


The first place I send my photos online is to the Digital Story Flickr site. But I have to admit, I haven't been sharing those images on Twitter because things weren't wired together quite right. That's changed now.

New Share Feature in Flickr

In a recent post from the Flickr blog titled, Upload once, share everywhere, they show off their new set of social networking tools. They're quite nice. Take a look at the toolbar up by the Actions menu. Any accounts that you've connected to in your preferences will be available there. I tested by sharing a picture via Twitter.

Flickr to Twitter

I clicked on the Twitter icon, wrote the text, and hit "Post." When my Twitter followers clicked on the link in my Tweet, they went directly to the Flickr photo page. Works great, and it's very easy to use. You can do the same for Facebook, Tumblr, Blogger, Wordpress, and more. As a result, I'll be sharing more images on my Twitter and Facebook pages.

Flickr Training Available

We have lots of informative movies available in the lynda.com title, Flickr Essential Training. Stop by and learn how to get the most from your favorite photo sharing application.

Previously on The Digital Story

Using Google to Search Within Flickr

Flickr Keyboard Shortcuts

Introduction to Flickr Essential Training


twitter.jpg Follow me on Twitter


Flickr has terrific search tools, but some folks don't realize that they can also tap the power of Google to find images within the Flickr universe. In this short movie (from my Flickr Essential Training title), I show you how to set up Google for high-powered photo searches.

More Training Available

We have many more informative movies available in the lynda.com title, Flickr Essential Training. Stop by and learn how to get the most from your favorite photo sharing application.

Previously on The Digital Story

Flickr Keyboard Shortcuts

Introduction to Flickr Essential Training


twitter.jpg Follow me on Twitter


Jean Liebenberg

For the Feb.'11 Photo Assignment, TDS shooters got personal and assembled an intimate gallery titled Loved One. These will touch your heart. And which one will be the SizzlPix Pick of the Month?

The April 2011 assignment is "Broken." Start working on your contribution now. Details can be found on the Member Participation page. Submit your photo assignment picture 800 pixels in the widest direction. Deadline is April 30, 2011.

Please follow the instructions carefully for labeling the subject line of the email for your submission. It's easy to lose these in the pile of mail if not labeled correctly. For example, the subject line for next month's assignment should be: "Photo Assignment: April 2011." Also, if you can, please don't strip out the metadata. And feel free to add any IPTC data you wish (These fields in particular: Caption, Credit, Copyright, Byline), I use that for the caption info.


Photo by Jean Liebenberg. (Click on it to see enlarged version.) You can read more about how Jean captured this shot, plus see all of the other great images on the Feb. 2011 Gallery page.


Good luck with your April assignment, and congratulations to all of the fine contributors for February.


twitter.jpg Follow me on Twitter

-


Now Available! The Digital Photography Companion. The official guide for The Digital Story Virtual Camera Club.

  • 25 handy and informative tables for quick reference.
  • Metadata listings for every photo in the book
  • Dedicated chapter on making printing easy.
  • Photo management software guide.
  • Many, many inside tips gleaned from years of experience.
  • Comprehensive (214 pages), yet fits easily in camera bag.

Technorati Tags: , ,

There are very few plug-ins that I'd consider necessay. The editing tools in Aperture 3 and Lightroom 3 are so robust, that I can handle most of the things I need within those applications. But after working with Nik Software's Silver Efex Pro 2 for a few weeks, I've decided that this is my next "must have" enhancement.

Warehouse - Silver Efex Pro 2 Abandoned Warehouse: processed in Aperture 3 and finished with Silver Efex Pro 2 plug-in using global adjustments only. Photo by Derrick Story with an Olympus XZ-1. Click on image for larger version.

Silver EFEX is a tool to convert your images to Black & White. Now you may be saying to yourself, "I know 10 ways to create a B&W photo." So do I. But none of them work as well at this plug-in. The whole reason I even paid attention to this app in the first place was because I saw images that looked great, and I wanted to know how they were created. Many of them with Silver Efex Pro 2.

Abandoned Warehouse - Original Image Original image captured in mid-day lighting. Click on image for larger version.

New Features in Silver Efex 2

This new version adds many important tools:

  • Refined and improved black and white conversion algorithms
  • Highlight, Midtone,and Shadow Brightness control
  • Dynamic Brightness control
  • Amplify Blacks and Amplify Whites controls
  • Soft Contrast control
  • Highlight, Midtone, and Shadow Structure control
  • Fine Structure control
  • Selective Colorization
  • Image Borders
  • History Browser
  • GPU Processing
  • Improved interface and interaction controls

Most of the images I've worked on have only required the global controls. There are selective adjustments available, using control points, if you need them. I was surprised at how often I didn't. The basic workflow I use is relatively simple.

Silver Efex Pro 2 Interface Silver Efex Pro 2 interface. Click on image for full size version.

Basic Silver Efex 2 Workflow

For this example, I'm using Aperture 3 as the host app. But the plug-in works with Aperture, Lightroom, and Photoshop. And you get compatibility for all three in the box.

In Aperture, first I choose a color image, then I go to Photos > Edit with Plug-In > Silver Efex Pro 2. Aperture prepares the image for hand-off. Once the Silver Efex interface appears, make it full screen by pressing the "F" key.

On the left side of the three-paned interface are the presets, with the "000 Neutral" selected at the top of the column. You can preview the other presets by clicking on them. This is helpful to get a feel for the possibilites of your photo. I usually return to Neutral, however, and start working the controls on the right side of the interface. This way, I get the exact look I want.

Typically, the three basic global controls (Brightness, Contrast, and Structure) are collapsed. Click on the triangle next to their names to reveal more sliders. I also open the Loupe & Histogram window at the bottom of the right column, and click on Histogram. This graph is helpful when making tonal adjustments.

Now begin working on the highlights, midtones, and shadows of your picture. Be sure to play with the new Dynamic Brightness slider. It brightens areas of the photo while protecting the darker tones.

Next, I'll use the Amplify Whites and Amplify Blacks sliders to fine tune those areas. But the real killer slider here is the Soft Contrast control that adds mood by selectivly adding contrast in areas of the photo based on an intelligent alograithm.

Then I move to Structure, which is similar to "Definition" in Aperture and "Clarity" in Lightroom. But with Silver Efex 2 you have four Structure sliders, one for each tonal area, plus Fine Structure. Fine Structure can increase detail, as in the building photo. Or, as in this portrait, I decreased Fine Structure to soften the skin tones.

Now, I'll go back to the left column and click on the History Browser Icon. It's at the top of the column, third from the left. Then click on the Compare button. I generally use the Split Screen view to compare the work I've done with the original conversion. You can click anywhere in your "history" to compare that point in your work to the final product.

Once I'm satisfied with my adjustments, I click the Save button, and Silver Efex 2 prepares a Tiff and returns it to Aperture. I "stack" the new Tiff and original image for convenience.

The Bottom Line

Nik Software's Silver Efex 2 runs smoothly on my MacBook Air and keeps me excited about Black & White photography. There are many more features than I've covered here, such as the image borders, film emulators, vignettes, and toners -- plenty to keep you occupied well into the wee hours of the night.

You can see more images processed with this software on the TDS Flickr site.

Update! Hunt's Photo and Video is offering Silver Efex Pro for $129, plus free shipping, and a free upgrade to Silver Efex Pro 2. While supplies last.


twitter.jpg Follow me on Twitter


The Olympus XZ-1 provides most of the features you'd ever want in a compact camera - super bright f/1.8 lens, hot shoe, accessory port, and captures in Raw. But how does it perform in low light at the higher ISO settings? This week, I put the XZ-1 up against my current compact favorite, the Canon S90, to see who survives the ISO smackdown.

You can see the test images for yourself, and read about the results, by checking out Olympus XZ-1 ISO Test 100-3200.

Listen to the Podcast

You can also download the podcast here (31 minutes). Or better yet, subscribe to the podcast in iTunes. You can support this podcast by purchasing the TDS iPhone App for only $2.99 from the Apple App Store.

Monthly Photo Assignment

Blue is the March 2011 Photo Assignment. You can read more about how to submit on our Member Participation page. Deadline for entry is March 31, 2011.

TDS Summer 2011 Photography Workshop

We're making plans now for the Summer 2011 TDS Photography Workshop. If you want your name on the reserve list, just drop me a line.

More Ways to Participate

Want to share photos and talk with other members in our virtual camera club? Check out our Flickr Public Group. It's a blast!

Podcast Sponsors

Red River Paper -- Try the $7.99 Sample Kit.

Make Your Photos Sizzle with Color! -- SizzlPix is like High Definition TV for your photography.

Need a New Photo Bag? Check out the Lowepro Specialty Store on The Digital Story and use discount code LP20 to saven 20% at check out.


Technorati Tags:
, , , , ,


Rogue Grrid

One of the most difficult things to do with off-camera flash is to put the light exactly where you want it, and nowhere else. This task just got a bit easier with the new Rogue 3-in-1 Honeycomb Grid ($49). Like the already popular FlashBenders, the Rogue Grid fits on just about any flash, and looks good in the process. (Guts of the Grid shown here. The kit comes with a very stylish nylon mount and pouch to hold it all.)

There are two honeycomb discs: 25 and 45 degrees. You can use them individually, or put them together to create a 16 degree pattern. I played with the discs today, and was quite pleased at how much control I had over the output.

The entire kit only weighs 3.5 ounces, and it fits easily in most camera bags. Along with a coupe FlashBenders, you suddenly have pro studio power in a very lightweight kit. I'm working on some test shots that I'll post here. Stay tuned.


twitter.jpg Follow me on Twitter